May 31, 2011

Together-Sketch Along Tuesdays Frosted Designs

Good Tuesday Morning to you lovely ladies.. Its Sketch Along Tuesday's  reveal time at Frosted Designs today and I had a blast creating a few hand made embellishments to go along with the awesome sketch that was made for us by our very talented Debbie Burns...
So without a further a do, here is my take on our sketch:


I finally put my Bo Bunny Gabriel papers to good use..LOL  Been dying to play with them for months now...
and here is the sketch I worked with :
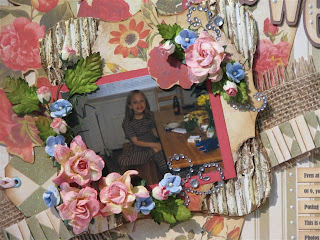
Only change I made to the sketch was the placement of the title.. but I loved this sketch cause of the versatility.. One photo or two, you choose.. I picked one of my hubby and I standing infront of the little water feature at the Botanical Gardens in Dubuque Iowa.. 
and for a few close ups of the layout:


and for supplies used:

papers by: Bo Bunny Gabriel
cardstock: pink and white
Martha Stewart punch around the page
Small Flower punch
roses and flowers by Prima
leaves by I am roses
Liquid pearl: pink and light blue

Cricut cartridges:
Home Decor: scalloped circle
Cindy Loo: title font

hand made tiny chineese roses
hand made flourish out of cardstock and cardboard
( A wonderfully talented lady Lynn Biermann at Pretty Paper Swirls that showed a cute tute on how to cover chipboard and add elegant detail to it, so the flourish was an idea I got from her.. do stop by her blog cause her work is amazing)

Well ladies, that does it for me for today... Do stop by Frosted Designs and see what the other design team members have created using this same sketch and join in on the fun.. 
Hope everyone has a wonderfully creative week..
hugs
Nanné

May 27, 2011

Love Birds-SOUS reveal May 27th

I have lots of good reasons for being thankful its Friday today,  first being its reaveal day over at SOUS and secondly, I have the weekend off of work..Hallelujah!!..and can I get an "Amen!"..LOL
This week we have yet another amazing sketch made for us by our very own Vanessa Waller aka Ness 
I absolutely adore her sketches and I kind of TRIED to keep it simple..LOL (even I laughed at that one!) So anyway, here is my take on our sketch:

Not sure I'm 100% happy with the cream cardstock as the scalloped circle, but its there to stay..LOL
these colors were a challenge to work with for some reason..

and here is our sketch:

The photos are of my daughter Amber and her boyfriend Jooa.. She told me she had new photos on her Facebook page, so I went and snatched some up... I think this photo is so sweet!!
and for a few close ups:


and for supplies used:

Cricut cartridges:
Cindy Loo: scalloped circle, flourish and doily
Songbirds: bird cage, marquee and title "Birds!"
Sweethearts: Title "Love!" 

Flowers by: Prima
Tiny flowers: punch
White Liquid pearl
Papers by: Deja Views
cardstock: Black, brown and cream
Tim Holtz distress ink: Peeled Paint
black twine

kind of a short list wasnt' it..LOL
Well ladies... I'm off to enjoy my weekend by scrapping my little heart out and I hope you do as well.. and if you do and I know you will, do stop by SOUS and check out what our amazing team has created using this same sketch.. Once again, these ladies have outdone them selves.. its seems like I say that every time its reveal day, but  these layouts of theirs just get better and better everytime.. 
and so with that said, I hope you have wonderfully creative weekend..
lots of hugs
Nanné

May 20, 2011

Spread Your Wings

Wow!! this makes how many posts this week?..LOL  I'm on a scrappy roll and dont' know why..LOL
I've been so happy being able to create a few pages and a little extra, which I posted yesterday.. I absolutely love making those keep sake boxes by the way.. 
You can even add legs to them so they dont' have to sit flat on the counter..OMG!!off topic there aint' I..LOL
back to my layout...LOL
so, I'm still having issues with going through my photos that I have in my box of photos, cause I'm afraid of seeing my dads photos in there and those will just get the tears flowing and I'm trying to take a much needed brake from the tears..
I have been stalking my daughters FB page as you all know and I have scrapped this picture before, but this layout I made for myself as the other one I had made for her..
She moved out of our home about a year and half ago and so I wanted to make a memory page of that part of our lives.. so, here is the layout I made:
There is a branch and a birds nest under there some where I swear...LOL  One of these days, I'm gonna challenge myself to a "Less is More!" type of layout... I had no plans on using such big flowers, but there they are anyway...LOL   But all in all, I really like how it came out..
 and for a few close ups:


and for supplies used:
Cricut cartridges:
George and Basic Shapes: Oval photo mats
Home Decor: scalloped Circle
Cindy Loo: Font 
Sentimentals: Butterflies
Create a Critter: Birds Nest
Songbird: Marquee

Papers: DCWV Botanical Stack
Cardstock: dark and light violet, green, cream and brown
All Flowers and Leaves by : I am Roses
liquid pearl drops
hat pins
Rafea for the birds nest
Tim Holtz Distress ink: Vintage Photo and pealed Paint
chalks
pearl halves
pop dots

Well ladies.. thats it for todays post.. maybe, just maybe I'll get something together for Friday.. Lets see if the mojo keeps flowing through my veins..LOL
I hope all of your wonderful ladies have a wonderfully creative rest of the week and I want to thank each and every one of you for stopping by and taking a look ..
Hugs
Nanné


May 19, 2011

Teacher Appreciation gift!!

Happy Thursday ladies...
I actually got a few projects started and finished this week..Go me!!..LOL
been feeling a little bit in the dumps lately due to my dad passing and I've been having a little bit of a hard time getting my groove back..
I actually have to admit I'm really happy that I got a few projects done this week, which is actually more than usual..LOL  
Here if Finland, we dont' have a "Teacher Appreciation!" Day, but the last day of school which is known as the Spring Fling, all students hand the teacher a gift as a thank you for the year.. Usually its a bunch of flowers or maybe a personlized gift..  Well, I wanted to hand make her something this year and so I came up with this keepsake box..  I plan on filling it with candy or tea or something that she really likes !! Candy is not forbidden in school here and neither is chewing gum.. LOL  god knows how many times I got in trouble in school for chewing gum..LOL
so, any way, here is my project !

It measures 5" x 7" and its 2.5" tall.. Perfect little pencil box..LOL  but this one will have goodies in it!!


The top of the box, which I will be adding a thank you tag on it and who its from..


and a photo of the inside.. pretty plain!!

I also thought to take a few photos of the making of this keepsake box incase anyone out there was interested on how I made and wanted to give a it ago themselves.. It really is pretty simple and it gets easier everytime you make one..LOL
so here we go:


for your supplies you will need:
two cereal boxes ( maybe one will be enough depending on the size)
paper trimmer
decorated papers ( I chose DCWV-Grade School stack)
Glue stick
bone folder or brayer
ruler or measureing mat
craft knife
scotch tape
tape runner( I used my ATG gun)


flatten and open up your cereal box.. cut it into the following pieces with your paper trimmer
1=5"x7", 2=2.5"x5" and 2=2.5"x7"  and lay them out as shown in the photo


now, take your roll of tape and tape them together leaving a small space inbetween each cardboard piece .
trim off excess tape!!  its just easier to move it around once they are all taped together..


then choose your 12x12 size printed paper and glue the cardboard piece to it as shown..
I used my brayer to help stick it all down evenly, you can also use your bone folder


now, trim off the excess paper like I've drawn out in the photo.. leaving about a 1/4" on each side.. I used my craft knife, but you can also do this with your paper trimmer..

Now, take your glue stick and glue the edges down.. I used my bone folder to help with the seems and pushing the edges firmly down to the cardboard..
Once you are down with the outside of the box, you will line the inside with either cardstock or printed paper.. I cut three pieces.. 2= 3"x5" and 1=9 3/4" by 11 3/4".. 

Once I got to this stage.. I got so over excited, I forgot to take more photos of the progress..LOL  But, I will walk you through them... super simple..


I put the box together, by doing the following... I gently with the aid of my bone folder folded the sides up, scoring the edges (where they were taped together), so not to bubble or tear the cardstock on the inside..  before putting it all together I added the trim to the top of the box,  by cutting 2=1 1/2" by 5" and 2= 1 1/2" x 7" pieces of decorated paper, which I scored in the middle and then taped them to the outside and inside of the box, giving the edges a finished look.(you can see this in the photo where the lid is open)
Now, I finally started putting it all together.. pushed up the edges and then I tore a piece of tape and secured the corners with it on the outside, keeping the box together while I cut a small piece of decoreated paper 4=1 1/2" by 2 1/2" and used my ATG gun to tape them over the scotch tape.. Hiding the scotch tape and will help keep it secure..


and for the lid... I cut another piece from the cereal box, measureing 5 1/4" by 7 1/4".. I cut a small piece of decoreated paper for the hinge 6"x 3" and scored it in the middle..using my ATG gun to tape it to the back of the lid (underneath), then covered both the top and bottom of lid with decorated paper.. finally using my ATG gun, I taped the hinge to the inside of the box..


just click on the photo for a bigger view of the box.. 
I certainly hope this tutorial, even if a few photos were missing due to my excitement, will help you in making one these keep sake boxes.. these really do have many uses, not just for photos, but keeping hand made cards, etc..
I want to thank you ladies all so much for stopping by today and having a look at what I've created..
Hope you have a wonderfully creative rest of the week...
Hugs
Nanné
p.s.  If you do create one of these, I'd love to see it so please leave a comment linking me back to your blog

May 18, 2011

Here for the Cheerleaders

I had the day off yesterday and decided to just try to whip up a little something different.. I've been making a lot of girly layouts with ribbons and flowers, so it was a nice change to make a layout of my boys..
these pictures were taken at their very first baseball game that their dad and uncle took them to a few years ago while we were on vacation in the Florida..  When I asked them what was their favorite part of the game, their answer was "The cheerleaders!"...LOL Typical teenage boys...
So, here is the layout I struggled with this morning..LOL

I added the big brackets to the photo to hide some of the people sitting by them, since they were total stranger and didn't deserve to be on my layout..LOL (kidding).. I think it came out really good for a teenage boy layout.. They really are the hardest for me!!
Here are a few close ups:


These cute dye cuts are from the "Boys Will Be Boys!" cartridge.. They aren't just for the little kids, but can be used for the teen pages as well..LOL

and for the supplies used:

Cricut Cartridges:
Boys Will Be Boys: "Font: Cheerleader!", Baseball, Glove, 2009 and Brackets
George and Basic Shapes: Large hollow circle, Stars and triangle (to make the arrow)
Plantin Schoolbook: "Font: Here 4 The!"

Papers by: K&Co Rough and Tumble
Cardstock: Black, white, yellow, orange, green

White gel pen for faux stitching
Foam tape 

I think that should about do it for the list.. its not a very long one..LOL  
I loved pushing myself and struggling a little bit.. I know my boys will enjoy this layout !!

Thank you all so much for stopping and taking a look at what I have created.. 
I hope everyone has wonderfully creative rest of the week..
Hugs
Nanné

May 17, 2011

Sweet- Sketch Along Tuesdays Reveal

Its been such a treat to be on the design team over at Frosted Designs.. I love the sketches the girls come up with and I always get to do a little something new...
for this weeks sketch, I used a piece of corrugated cardboard for the middle.  I actually used a chipboard mini album piece to trace the shape onto the cardboard and then cut it all out with scissors..  It was so much fun to make something new..
Here is my take on this weeks Sketch:
. I have to admit I was in a bit of a hurry to get this layout finished due to my moms wedding and getting everything ready.. I wish I would have had more time to get a little bit more detail in there..LOL

Here is the sketch:
and here are some close ups of the layout:


and for supplies used:

Papers by: DCWV Botanical Stack
cardstock: cream and red

Flowers by: I am Roses
leaves by: I am Roses
font: SCAL
Liquid pearl: white
corrugated cardboard
craft paint: white and cream
Tim Holtz distress ink: Vintage Photo
Bling by Prima: say it with Crystals
tag: hand cut
mini eyelet
pink ribbon
burlap ribbon

That does it for me for this Tuesday.. Thank you all so much stopping by today and taking a look at my take on our sketch .. Do stop by Frosted Designs and join in the challenges this month.. there are prizes to be won and the more you play, the bigger your chances are of winning something fun for yourself..
Hope you have a wonderfully creative week..
Hugs
Nanné

May 13, 2011

World Traveler- SOUS reveal for May 13th

My daughter has been a traveler since she was like 15 yrs old.. Her first trip, she jumped on a train and went up north without me knowing about it till it was too late...But, living in Finland is such a blessing when it comes to children and safety.. Dont' get me wrong, you still have to be careful, but its nice that they can venture out and you dont' have to be at the end your seat all night long..LOL
Last year for her 21st birthday, her and her boyfriend ventured to Sweden, which is just on the other side of the big pond..LOL  They jumped on a cruise ship, stayed on there all night, had dinner and then in the morning spent the day walking around Stockholm, enjoying the sites..
Well, This photo is of her standing on the bridge of the ship and Stockholm is in the back of her.. I love this photo, even with the sun in the background spoiling it ..LOL
I know, you would really like to see what I'm talking about right?...LOL
Here is my take on this weeks sketch challenge:
and here is the ORIGINAL sketch that we were lucky enough to have our very own Vanessa (aka Ness) desing for us girls.. Thnk you Ness!!


I really loved working with this sketch and I plan on using it again and again and again...LOL  I think it so much potential with a little imagination..

and for a few close ups of the layout:


I actually took some time and made my very own flowers and leaves.. Haven't done that in a while!!

and for supplies used:

cricut cartridges: 
Mothers' Day Bouquet (Flowers and leaves)
George and Basic Shapes: (Hollow circle and half circle)
From my Kitchen: Big Tab
Songbird: Marquee (halved)
CindyLoo: Title Font, brackets and flourish

Papers by: K&Company (big variety box)
Cardstock: Pink, cream and burgundy
Pearl halves
Alphabet stickers by: EchoPark
Tim Holtz distress ink: Vintage photo
Black marker for faux stitching
Liquid pearls for pearl drops

I know I'm possibly forgetting something off of that list...LOL
 We are giving away blog candy this month for one lucky winner and its sponsored by Vanessa over at "Scrap with V!"..Here is a sneak peek at what you can win.. Its $40 AUD worth of  "A2Z Scraplets!" and anyone can win it, you just have to play all month long.. The more you play, the better your chances are of winning..
  I want to thank you ladies so much for stopping by today and I certainly hope you get some time to join us ladies over at SOUS and scrap with this sketch.. I'm sure it can be used for a card as well!!
Hope everyone has a wonderfully busy scrap fabulous weekend..
Hugs
Nanné

May 9, 2011

Lookie what I got today

I've been sitting on pins and needles the last week waiting for my package to arrive from Floren over at Generations Crafting.. Once in a while I put in a big order and stock up on stuff.. (you know, just incase)..LOL
I got my postage slip today in the mailbox letting me know there was a package waiting for me for pick up at my local post office and I'm telling you, I left skid marks in my drive way thats how fast I took of to the post office and look at all the pretty stuff I got and I just wanna touch it and play with it..LOL.. 
It's like Christmas in May.. I love it all!!!

and most of it was on sale, so I saved a lot!!! 

I better get it all put away before the hubby gets home..LOL
thnx everyone for stopping by and joining my joy.. 
hugs
Nanné

May 7, 2011

Online Crop over at Frosted Designs


Ladies ladies ladies .. 
If you haven't already stopped by, get over to frosted designs and join in on their online crop today.. theirs so many wonderful events happening, games, challenges and quickie,  that it will just blow your mind.. Lots of fun challenges games and prizes to be won..  You will find all of the details at Frosted Designs..
and all you Facebook users,  Check out Frosted Designs Facebook page,
Have a great time at the crop everyone and good luck on the prizes..
Hugs
Nanné

May 4, 2011

Whimsical Wednesdays Reveal-May 4th

Happy hump day ladies.. 
Well, us girls over at Whimsical Wednesdays is having our monthly Scrapbook layout reveal today.. Our theme this month is Birthday and it has to have embossing on it..
I have had my cuttlebug for sometime now, and lets just say " I dont' use it enough!".. I was so happy to be able to put some of my embossing folders to good use..LOL
The photo is of my daughter Amber at her 4th Birthday party.. I was beyond pregnant in that photo with my eldest son Aaron.. Amber was so happy when she got to open all of her millions of presents and a few months later became a big sister for the very first time..
so, here is the layout I created for our challenge:
I wanted to make the layout happy and colorful, being its for a little girl..  I did struggle with the colors and the patterns, but I really like it!!
the papers I used are Echo Park: Spring Time collection.. Ambers birthday is in May, so those were perfect !!
and for a few close ups of the layout:


Added Glossy accents to the colored spots on the balloons and stickles to the title..


 I actually embossed the tag using the "Victoria" embossing folder by Provocraft and my little green machine..
and then I embossed the rossette with the "Dots" folder by Provocraft

and for the supplies used:

Papers by : Echo park "Spring Time" collection
Cardstock: White, blue, red and yellow

Cricut Expression:
Once Upon a Princess: Tag
Pooh Font: Title "Little Girl, Big Day!"
Pooh and Friends: " Balloons!"
Songbird: Marquee
George and Basic Shapes: Circle

Martha Stewart border punch
Tim Holtz distress ink: Broken China, Mustard Seed, Peeled Paint, Fired Brick
Inking tool
Stickels
Glossy Accents
pop dots- balloons
Hand made rossette and paper swirls

So, ladies.. That does it for me this Wednesday, thank you all so much for stopping by today and takig a look at my take on a birthday challenge.. Do stop by Whimsical Wednesdays and join in the fun .. You have a whole month's time join.. So, that should give you plenty of time to get your supplies together and create a masterpiece of your own..LOL
Hope everyone has a great and creative rest of the week..
Hugs
Nanné