December 24, 2010

Trim the Tree- SOUS reveal

First of all, let me start my post today by wishing everyone a very
Merry Christmas..

Us Finns start celebrating our Christmas on the eve.. Tonight, I will be serving Christmas Eve dinner for my family and this year it includes Ambers new boyfriend Jooa and my moms new boyfriend Janne..
There will be a total of 8 of us at the dinner table, I'm sad that my dad won't be here to celebrate it with us like he was last year.  I'm sure he's happy to be spending Xmas at home with his wife in the warm Florida sun..LOL
So ladies.. Us girls over at SOUS have been busy..Whew!  I was so happy to take a day off from shopping, cleaning and baking to be able to just relax and get those creative juices flowing..LOL
without further-a-do...LOL
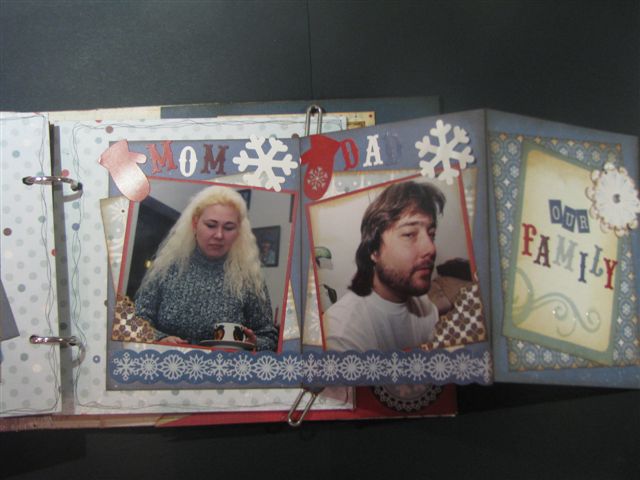
Here is my layout for this weeks reveal:
and the sketch for this week:

This was so much fun even though I lost my patients with those pinwheel flowers..LOL
they just wouldn't cooperate, but finally I got them to work..
and for some close ups:
As you can see its not so orange as the main pic.. the lighting is so awful in here and no matter where I tried taking the photo, it was no better.. sorry about that..


for Supplies used:

Papers by: Graphic45: Christmast past collection
cardstock: red, black and green

over sized brads
christmas brads
green brads
string of pearls
Prims E-line Pearl drops
flowers by: Making Memories
flowers by: Prima

Cricut Expression:
Winter Frolic Cart:
Christmas tree ornaments

Home Decor:
Flourish

George and Basic Shapes:
Large circle

SCAL:
title font: Frosty

So, now I'm off to cook and get ready for the holidays to begin..
I truly wish you and your family's a very Merry Christmas..
Thank you everyone so much for stopping by and taking a look..do stop by SOUS  and get inspired today..
Have a great and creative week..
Hugs
Nanné


December 22, 2010

Winter mini album

Snow Day Mini Album-Generations Crafting DT

As Christmas slowly gets closer and closer, I took a few days off from shopping and baking to create this cute little Snow Day mini album for Generations Crafting.. I've really become addicted to these little things, they are so much fun to make and I can add so many little things like tags for instance, that I normally wouldn't add to a big layout.. I love finding cute little funny sayings as well.. 
I was so lucky to be able to work with the new Echo Park Wintertime line..  Wow! those papers are just stunning to say the least and the set comes with little 6x6 sheets behind some of the big ones.. Oh and the journaling tags, I loved those..saved me so much time from having to make my own... ok ok ok..so lets get to the mini..LOL
I won't get into too much detail cause I want you to watch the video instead..LOL it will walk you through most of the mini.. its only my second video so have patients with me...LOL  I will be posting the video later in the afternoon when I get home from work..  :)


For supplies Used:

Papers by: Echo Park
 *Wintertime paper stack includes, tags, alphabet stickers and dye cut stickers

Bo Bunny Naked Binder

cardstock: light blue, dark blue, white and red

Glimmer mist: Frost

Tim Holtz Distress ink: Vintage Photo
Prima flowers and roses
Prima E-line pearl drops
Pop drops
Silver Stickles
swivel clasps: 7-gypsies
brads
Tim Holtz metal corners

black marker pen for journaling
white ribbon
xmas theme ribbon
snow flake ornament
Snow flakes by: Marcella K
Circle punch by Fiskars (medium)
Glossy Accents
White embossing powder
Tim Holtz embossing ink
Heat tool

Cricut Expression:

George and Basic Shapes
Hearts, circles for snowman

Paper doll dress up:
mittens for snowman

Pooh and friends:
snow hat on snowman

Christmas Noel:
snowflakes that are welded to the square 

Winterwoodland:
font for title SNoW

Plantin Schoolbook:
font: DAY

Mickey and Friends:
Paw prints and bones

I know I'm forgetting something...LOL  
I really had so much fun putting this little mini together and I want to thank you for stopping by and taking look.
Do stop by Generations Crafting and see what great deals she has in her store..
Thank you and have a great and creative week..
Hugs
Nanné

December 10, 2010

Mickey's Secret Garden-SOUS reveal

I'm so truely happy today is Friday.. For two reasons actually, one its reveal day at SOUS today after two long weeks of waiting and then I have the WHOLE weekend off of work.. Saturday, my mom and I are hitting the big mall out of the city to do some much needed xmas shopping and then Saturday night were having our annual xmas party at work..
Well, us girls over at SOUS had a  dye cut paper challenge this week and NO sketch.. it was so much fun to work with a few of the dye cut papers that were very generously donated to SOUS by Floren Boynton of Generations Crafting..
I used the Jazmyne glitter dye cut, but cut the edges off cause I had no papers to go with the black.. and I am so out of black cardstock.. I've been hunting high and low on the internet, but it seems like all of my closest online stores are all out of the stacks.. Argh! frustrating to say the least.. 
so, I just cut the scalloped edge off  :(  heart braking to say the least..

Here are some close ups of the layout:
a little hand made tag that I attached the title of the layout to..
We were at Disney World Magic Kingdom, Florida back in 1993.. 
 I used My Minds Eye papers along with the Bo Bunny dye cut paper.. I like the romantic and soft colors.. I did ink all of the edges though.. I found this dye cut word with the My Minds Eye stack.. added some glossy accents to the letters to make em stick out some and then string of pearls..

Some Prima Flowers, pearl brads, Martha Stewart Edge Punch and some hand doodling with a black pen.

That should about do it for me today..
I want to thank you all so much for looking.  I do hope you get a few mins this weekend to stop by SOUS and see what all of the other DT members have created using the same dye cut papers..
Hope you all have a great and creative weekend..
Hugs
Nanné

December 6, 2010

Recipe Mini Album

Recipe Mini for Daughters Friend Sini..

Whew! this little project took FOREVER to get finished..But it was so much fun to make.. I'm gonna make me one as well.:LOL
The story behind the mini is, when Amber (daughter) moved away from home, her friends Sini started missing my cooking..LOL  When they were younger, Sini always had Amber call home and ask what I was cooking for dinner and then when she spent the night, she always wanted me to make pancakes for breakfast.. 
I've tried to put all of Sini's favorite recipes in this little book that meaures 7.5" x 4".. 
I actually made my very first video walking through this mini album.. I'll get that posted on youtube as soon as I figure all that out..LOL hope its blonde proof..LOL   I will post it here once and if I get it up and running..dont' hold your breath though..LOL

UPDATE:
OMG! I so got my VERY FIRST video up and running..
so anyway.. lets get to the pics shall we..:
Here is the front cover.. I cut old cereal box for the chipboard, My Minds Eye for the papers, some ribbon, spoon, heart, and fonts are all using my cricut expression. Flower I think is by Prima, not 100% sure, and a red brad..

on the left is a photo of my daughter (on the right) and her friend Sini.  I added her favorite breakfast recipe Pancakes on the right side of the page. Hand cut the tags! recipe card I cut with my cricut.
the right side is a transperancy sheet.


this page I added another breakfast recipe on the left side "Eggs Benedict!" and then a pocket with a photo on the right side.. I love that funny little quote!


and then for some Pasta dishes.. Fettucine Alfredo is on the left side, I have a pull out recipe card there and another funny quote..
On the right side I added a Mac-N-Cheese recipe, also with a pull out hand made tag.
 Then I added another one of her favorites, Patty Melts.. Once again on a pull out tag and then on the right side, I added a transparency sheet with her photo and a hand made tag, with yet another quote..


Flipping the page, you have another photo of her and a funny little quote on the left page and then my very famous pizza recipe on the right..LOL  hope she gets lots of use out of that one.. practice makes perfect..
Oh! I made that pizza with several cuts using my cricut..


then onto the cookie pages..
Chocolate chip cookie recipe on the left page and added her photo to another transperancy sheet with a funny little quote..


Then flipping the page:
other side of transparency I add a photo of Sini with another funny quote. On the right side, I added a pull open folded photo mat (so to say) that I added a recipe for Peanut Butter Cookies.. it was a long recipe, so it took a lot of space.. I tied it with a black ribbon to help keep it closed when not in use  :)


flipping the page, I found a great picture of my daughter, Sini and their friend Piitu.. In the tag pockets are tags that have the ingredients list for a delicious Triple Chocolate Torte.. On the right side, I have the directions on how to make it..


and the last page.. My daughter Amber and Sini on together on the left side with a cute little quote.. Added her photo onto the right side with yet another cute little quote..

well, thats it...The mini is all finished and heading over to its rightful owner.. Hopefully I can get it to her before xmas.. 
My daughter and Sini had met up for Coffee at a local mall a few days ago and Sini had suggested they needed to come over to my house for dinner so I can cook them something fattening...LOL
gotta love them both..with all of my heart!!
Thank you all so much looking and have a great and creative week..
Hugs
Nanné

November 26, 2010

Happy Faces of Christmas-SOUS reveal

I've gotten into the Christmas Spirit..LOL  I've been dying to get all of my kids' Christmas pictures scrapped and I think this is only the third xmas layout I have made.. need to get cracking! These photos were taken a long time ago, maybe back about 8 years or so.. 
My boys were always in their underwear, so I appologize for that..LOL

Here are a few close ups of the layout:


The gingerbread men were so much fun to make..Some tan paper, Paper Doll Dress up cartridge, some chalks and a white gel pen.. The heart cookies were cut using George and Basic Shapes and the circles are a punch. The mistletoe is from Stretch Your imagination and the xmas lights are from Christmas Cheer.
Titles are cut from Plantin Schoolbook and Christmas Noel


well, that about does it for me for today.. I've been busy this week and now, to start on a xmas mini album I've been dying to make...LOL  Hope to have it posted soon..
Hope everyone has a great and creative weekend..
Hugs
Nanné

November 24, 2010

Big Black Friday Sale going on over at Generations Crafting..


Did I hear you ask about Black Friday? I thought I did! What good is Black Friday without a screaming deal? So, you want a really good deal for Black Friday? You've got it! Spend a minimum of $25 and get the Bo Bunny - Sticker Grab Bag for only $1! Spend a minimum of $50 and get the Bo Bunny - Paper and Embellishment Grab Bag for only $5! Want them both? Sure! Just spend $50 minimum and get both for only $6! Here's how:

To get the Bo Bunny Sticker Grab Bag for only $1 on Black Friday: Load up you r cart with a minimum of $25 worth of goodies, add the Bo Bunny Sticker Grab Bag to your cart and enter coupon code: BLKFRI1 during checkout!

To get the Bo Bunny Paper & Embellishment Grab Bag for only $5 on Black Friday: Load up your cart with a minimum of $50 worth of goodies, add the Bo Bunny Paper & Embellishment Grab Bag to your cart and enter coupon code: BLKFRI5 during checkout!

To get the Bo Bunny Sticker Grab Bag AND the Paper & Embellishment Grab Bag for only $6 on Black Friday: Load up your cart with a minimum of $50 worth of goodies, add BOTH Grab Bags to your cart and enter coupon code: BLKFRI6 during checkout!

Remember: you MUST spend the minimum (see above) in order to get the di scount on the grab bags. Also, you MUST add the grab bag(s) to your cart or the coupon code will not work. Coupons for Grab Bags are good on Black Friday - Friday, November 26 - ONLY!! You have until 11:59pm or while supplies last!
We will be closed Thursday, November 25 through Sunday, November 28 for the Thanksgiving holiday. Shipping will resume Monday, November 29. Please be patient with us while we catch up on shipping.
Have a wonderful and joyful Thanksgiving holiday and don't forget to count your blessings!
Happy Crafting!
The Generations Crafting Team
Floren, Dave, Lori, Jeanette, Jasmine & Ericka
sales@generationscrafting.com

November 23, 2010

Girly Girl Mini Album-GC design team

About a week ago I received this awesome Basic Grey paper set Marjolaine from Floren over at Generations Crafting and at first I wasn't sure what to make with them, cause the colors were so not me...LOL
But, I have really gotten into making all these mini albums and I thought to try a different envelope mini and I got the inspiration from a lovely lady on YouTube known as Marion from APieceOfCraftDotCom.. clicking her name will take you to the tutorial video on YouTube..
This was really a quick and easy little mini, the front cover measures 4 1/4" by 4 1/4".. It only took me two days to get it started and finished.. It was so much fun!!

Here are some pictures of the inside of the mini in order:


I used a piece of transparency on the bottom of the left page, inked it and then added a flower and bling.
The right side has a pull out tage and a small tag for journaling.

On the left I added a flip open photo mat and the right side is a transparency sheet, that I cut down to match the other pages.. added some stamped images on it and then a photo mat and flower.
 this is the same page as above, but just the picture mat is flipped open.


flip the page and we have the other side to the transparency, with another photo mat and some ribbon and buttons attached.. The other side has a small photo tag in the pocket.
On the left is just a photo mat, but then on the right we have a tabbed chipboard piece that I have cut down to size, added a pocket and tag.. with some rub-on words and phrases..
Photo mats and tags.
rub on words and some more tags.
  Here i used some run-on "friends" phrases and some of the elements from BG stack

On the left we have a three fold photo mat that I added ribbon to, to help keep it closed and added some rub-on words.. other side is a photo mat and pull out tag.
and finally the last page: another photo mat on the left and then a pull out tag and pocket on the right..

Whew! thats a lot of pages...LOL
I added a one transparency page in there and then I had made a flea market find while vising Florida las summer.. someone was selling a BG Tin re-fill for only $.99, which had some tabbed cardstock in there.. well, I took one and cut it down to size.. fit in perfect..
I had so much fun making this little mini and I can't wait to fill it with photos of my daughter..
and now for supplies Used:


Green and light blue business size envelopes
chipboard (covers)
binder rings
ribbon
cardstock:  blues and greens
Prima flowers
Prima bling
buttons and brads

Thank you ladies all so much for stopping by and taking a look.. I hope you get a minute to stop Generations Crafting and check out the project Gallery by clicking HERE.. their are some great talent to get you all inspired..LOL
Have a great and creative week everyone..
Hugs
Nanné

November 19, 2010

Midnight Frost Mini album-GenerationsCrafting DT

We love our scrapbook papers right? and we all have our favorite makers right?..Well, I have to say that I'm really loving the Bo Bunny paper lines they have come out with lately and how lucky am I to have such a wonderful lady as Floren over at Generations Crafting that has indulged me with these fab papers. 
I've been able to create lots of great winter stuff with them and when I seen the 6x6 stack, I knew I HAD to make a mini with it and with 36 sheets, I was actually able to make the stocking garland with them as well..LOL
Here are some photos of the mini album (these have gotten so addicting to make..LOL)
they are in order as you flip the pages:
Here is the front cover.. its glittered white papers for the background, I made my own blue flowers  and the leaves with my cricut and the white flowers are Primas, along with the pearl drops.. buttons and some blingedy bling bling bling..LOL

Once again, I made the background paper for this page myself, same method as the reindeer layout, only I used a snowflake stamp, embossing ink, clear embossing powder and Tim Holtz Broken China Distress ink.


Bo Bunny papes for the background, Marquee and small hanging tag cut with my cricut and so is the word art "Winter Fun!". The big photo mat tags are hand made and circles I used my Fiskars circle punch. Oh! and some snowflake brads..LOL


Once again,Bo Bunny papers, hand made pocket and tags. Tabs I designed and cut using my cricut. I also  used some of the chipboard elements that BB-Midnight Frost has.. Added a Tim Holtz journaling tag, but then it seemed like it was just out of place...LOL

Other side of the page.. going with the same look, only I made a big photos pocket for this side, which you can see the big photo mat sliding out on the right hand side..

Flipping the page and then we are once again using the BB papers and chipboard elements.. Added a lot of computer generated journaling/word art through out the mini.. Little winter quotes..

Then the last page.. the little folder on the left hand side has 4 hidden photo mats inside and then I added three large tags to the pocket on the right.. ribbon from my stash and some crochet lace..
I also did a lot of faux stitching with a fine tip black marker through out this layout, it was very time consuming, but I really love the look of it..

I tried taking really good pictures of the mini, but gloomy days and dark eveings aren't the best for taking photos in...LOL even with a flash!!  Click on the photo to be able to view it bigger, that should help viewing all the detail..
So, that does it for me for this Friday.. I had so much fun creating this little winter Mini and I'm hopeing to get some photos developed here real soon so I can fill it up...LOL
Hope you ladies get a chance to stop by Generations Crafting and see all the wonderful things Floren has up for grabs and be on the look out for some great specials coming out soon...
Thank you all so very much for looking and I hope you have a very creative weekend..
Hugs
Nanné