December 28, 2012

Warmth and Joy- Die Cut reveal SOUS

As much as I love Christmas and waiting for the day, I love it when its over as well.. Now, its time to get back to normal, like scrappin.. Too busy with work and shopping before Christmas to get anything done in the craft room...
and so with said.. Us girls over at S.O.U.S are having our die cut challenge reveal today and for this Friday's challenge, we were asked to use a DEAR on our project..


 I decided to create layout of my kids when we visited the north pole back in Xmas of 1999..  In the background of the photo, you can see one of Santa's reindeer that my kids got to go see... 
Sorry the photo is a bit drab.. it was kind of late when I took it :)

How about a few close ups:


Supplies Used:

Cricut Craftroom Software

Cricut Imagine

Cartridges:
Joys of the Season:
branches

Christmas:
Deer

Winter Frolic:
Title Phrase

George and Basic shapes:
background

Plantin Schoolbook:
scalloped edge

Martha Steward snow flake punch
Stickles
white marker

white cardstock

well my fellow scrappers.. I want to thank you for stopping by today and checking out my die cut project for S.O.U.S.. Do stop by and check out what amazing projects the rest of our Design Team members have created.. Till then, I hope you all have a scrap-tastic weekend..
hugs

December 21, 2012

Sweet Memories-sketch reveal S.O.U.S

Yikes.. Its so close to Christmas already.. I certainly hope I got everything taken care of before Monday..LOL   But before then, I get to share a layout with you that I created as my design team project for S.O.U.S.. For this Friday, our Sandi Clarkson designed a very cute sketch for us to play with and so, here is my take on the sketch:

I once again put my Imagine to work.. I used Imagines Mr.Frosty image cartridge for this layout.. lots of fun playing with the prints on that cartridge and I own it all to Margie.. She was so sweet and sent me that cartridge for absolutely nothing.. Wow!! how blessed am I to have a friend like that  :)

How's about a few close ups:

The title phrase I found on the Winter Frolic cartridge.. love that cartridge by the way :)

side pic.. no foam tape on this layout, I ran out and my local craft store did as well..

I printed the background paper and then added some white liquid pearl drops to the centers of all of the little snow flakes..

This photo was taken back in December of 1999 while my in-laws were here visiting us for Christmas.. We took an over night train up to Lapland to see Santa Clause... Here we are standing in front of the hotel we stayed at.. Had a lot of fun!!

for supplies used:

Cricut Imagine
Cricut Craftroom

Imagine cartridge:  Mr Frosty

Regular cartridges:
George and Basic Shapes: 
Circles

Joys of the Season:
Christmas ornaments, flourish and snowflakes

Winter Frolic:
Title phrase

white and brown card stock
white and pink liquid pearls
white gel pen
distress ink

well fellow crafters.. That's my Friday post for this week..
I'm so happy you all stopped by today and for leaving a comment :)

I want to wish everyone a very Merry Christmas since my next post wont be till next Friday..
I hope everyone has a peaceful weekend getting ready for the holidays..
hugs 

December 14, 2012

TOYS word album- Die Cut challenge S.O.U.S

Happy Friday fellow crafters..
Us girls over at Stuck On U Sketches are having out Die cut reveal today and our very own Sandi Clarkson is picking this months challenges..

 For today, our die cut challenge is "TOYS, TOYS, TOYS!"..

I love love love making mini albums.. My biggest challenge is always pushing myself to the next level.. I had created a word album a few years ago, but this one was definitely a huge challenge for me and Boy! this was a lot of work.  I'm so super happy with how it turned out.. I created the WHOLE word album using Cricut Craftroom and Cricut Imagine..  I actually spent 3 weeks on the whole process of creating this.. from actually designing it, then cutting everything, piecing it all together and getting the die cuts all ready..
and honestly, I can't wait to start on another one..LOL

I found a lot of random photos of my boys with some of their toys, so I added some of them into this album..

warning: This post is very photo heavy!!!!!!

So, Here is my "TOYS" Word Album:

and this is what it looked like once I had it designed:

 With CCR having the layers option, 
Its easy to create your very own word albums..  
I  welded the letter to the rectangle and cut it out of brown card stock, which I then attached to a piece of chipboard and cut with a craft knife..I didn't want to ruin a blade cutting the chipboard with my Expression, so a craft knife and a self healing mat was perfect, really quick and easy..
Oh! and when I say chipboard, I mean recycled cereal boxes.. perfect!!

How about some photos of the inside:
I will be adding them in order as you flip through the album.

I love the way the front cover came out.. Its not too fancy, but fun..

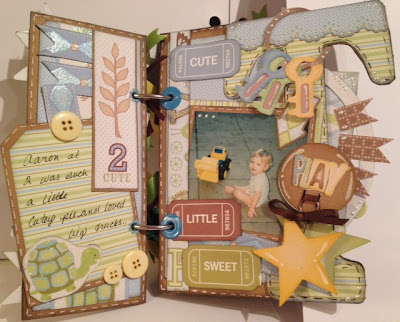
This is my oldest Son Aaron with his truck.. 


Then when you flip over to the back of the T shape.. 
I added another photo of my son Aaron as he was walking around with some building blocks.  He was about two years old in these photos.. 

This page goes with the one above it.. They sit right next to each other in the album..

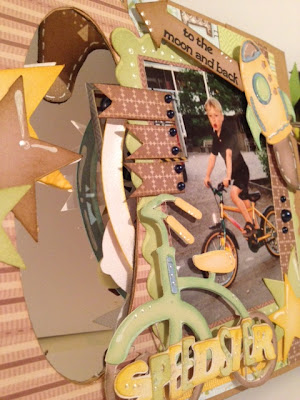
Side view, so you can see how I've attached mostly all of the die cuts, with foam tape..
Behind the "O " is my son Adam riding his bike.. it was his first bike and we had just taken the training wheels off.. If I remember correctly, he was about 5 years old...

I found some of the cutest phrases on the Boys will be Boys cartridge.. I attached the Speedster phrase onto the bike..

and on the Y side,  I added a photo of both of my boys together with their Jeep..

side view.. love the cute little plane :)

Once you flip the Y, you have a photo of my boys and my god niece Jasmin.. They were playing video games.. They started on video games really young  "thanks dad!"..LOL

This is one of my favorite pages in this album.. My boys together and they were so happy.. oh and they were always in their underwear (typical men)..LOL
The stamps I got from my good friend Stephanie at www.whimsical-designes.com.. She actually designed the stamps herself..

side pic to show off the dimensions with the foam tape..

and on the final pages, I added a baby pic of my son Adam.. He couldn't really sit up for along time by himself, so I had a bunch of pillows around him along with most of his toys to help him stay occupied..

The last page.. I was running out of die cuts by this page..LOL I added a few stars and then little wagon.. I though this came out simple, but cute..

For supplies used:

Cricut Craftroom
Cricut Imagine
Imagine cartridge for color palette: 
Loris' Garden

regular Cricut Cartridges:

Plantin Schoolbook:
base for album

Boys will be boys:
phrases, font, stars,baseball and baseball bat

B is for Boys:
Toys and boys

George and Basic Shapes:
Circle Silhouettes, small circles

Papers by: DCWV Baby boy stack
Card stock: White and brown

Extra wide eyelets
ribbon
foam tape

distress ink: 
mustard seed, shabby shutters, tumbled glass, 
black and brushed corduroy
ink applicator

Martha Stewart Edge punch
say it with pearls: Navy blue
white liquid pearls
white marker
white gel pen
craft knife
black fine tip marker
light blue buttons

well fellow crafters.. I think that's about it for this week.. I want to thank you all so much for stopping today and checking out my Word Album.. Do stop by S.O.U.S and check out what the rest of our amazing design team has created to inspire you with.. We also have some new faces, so come check those out as well..
I hope everyone has a wonderfully creative weekend..
Hugs 
December 7, 2012

Adventure Seeker-Sketch reveal S.O.U.S

How many days till Christmas?..LOL  I'm trying not to count...  
But since were all so patiently waiting, why not check out our Sketch reveal over at S.O.U.S..  This week our very own Sandi Clarkson created out sketch and I absolutely loved it..  I wanted to think outside of the box and I didn't want to create a Christmas layout just yet.. Maybe for our next sketch...

so, any who here is my take on this week sketch:

This layout was really difficult to photograph.. The papers are all from the Nursery Tail's Imagine cartridge and they printed a lot lighter than what was visible on CCR.. I have lots of close ups for ya, so you can get a better view of it..  oh and I really liked the way this came out.. I'm so loving that Wild Card 2 cart which is where the hot air balloon is from...

How's about some close ups:

All of the clouds and the sun are from Create-A-Critter cartridge..
I pop dotted the small clouds to give some dimension to my layout..


I found this cute photo of my three kids when we first moved to Finland.. Actually this is about a year or two after we moved here.. I had a crafting corner set up for them in our livingroom :)

I added lots of little liquid pearl drops to the hot air balloon..Inked all of the die cute edges and I think it came out super cute!!


The title phrase is from Three Birds on Parade cartridge..I also found the scalloped oval of A Child's Year cartridge..  The prints on the oval are super cute, light green with white stars.. Hard to tell though..

For supplies used:

Cricut Craftroom
Cricut Imagine
Imagine cartridge: Nursery Tails
for prints and colors

Regular cartridges:

A Child's Year:
Scalloped rectangle and oval

Create-A-Critter:
Clouds and sun

Wild Card 2:
Hot Air Balloon

3 Birds on Parade:
Title Phrase: Adventure Seeker

White and Black card stock
White gel pen
distress inks
foam tape
White liquid pearls
Twine

well fellow crafters.. That's my Friday post for this week.. I want to thank you all for taking the time to stop by and checking out what I've created for our sketch reveal at S.O.U.S.. if you have a few more minutes to spare, do stop by S.O.U.S and check out what amazing projects our Design Team members have created to inspire you to get crafting.. 
 I also want to specially thank those of you who have taken the time to leave comments on my projects, it really makes my day when I get to read them.. I love sharing my work and you are more than welcome to scrap-lift any of my layouts, etc.. Just please give credit where credit is due :)
I hope everyone has a scrap-tastic weekend..
hugs

November 30, 2012

Simply Adorable-Die cut reveal SOUS

Hello Fellow scrappers..

Here we are again.  Same time, only different day..LOL  Us girls are having our die cut reveal today and for this week, our Leah challenged us to use a GIFT die cut..  I didn't want to make another X-mas layout for this week  so, thought to grab a photo of my hubby and scrapped that instead..  Plus, I got to use the Sweetheart cartridge, which has been gathering dust for a long time..

 so, here is my take on this week's challenge..
This is by far, one of my all time photos of my hubby and I've scrapped it twice now..LOL

How's a few close ups and some details:

The blooms are from Mother's Day bouquet and the small center flowers are a punch.
I inked the edges with Fired Brick disterss ink and then added some pink liquid pearl.

The over sized heart is from the Plantin Schoolbook cartridge.. I actually used CCR to edit it a bit.. Stretched it,,Then used my MS edge punch to create the lace edge.. The tiny pink flowers are a flower punch.

The title is a phrase I found on the 3-Birds on parade cartridge.. added some drops of white liquid pearl for added detail and attached it to the layout using foam tape..  I also used my MS edge punch to create a band on top of the photo..

And finally my roses.. I cut a scalloped circle cut from the Bloom cartridge and created the roses.. super easy and I bet you can find great tutorials on youtube and Pinterest if you haven't already..  The big leaves are from the Mother's Day bouquet cartridge and the small leaves, plus branch's are a MS punch..  The gift boxes are from the Sweethearts cartridge..

for supplies used:

Cricut Imagine
Cricut Craft Room: design

Cricut Cartridges:

Bloom:
Roses (scallop circle)

Plantin Schoolbook:
Over sized heart

Mother's Day bouquet:
large leaves and mid size flowers

3-Birds of Parade:
Title phrase

tiny flowers: punch
small leaves and branch's: punch
feathers
Papers by: Victorian Parlor by Colorbök
white cardstock

distress ink: 
Fired Brick and Bundled Sage

white and pink liquid pearls
MS edge punch
foam tape

I think that about does it again for this week.. I had so much fun making my own flowers, which I haven't done in a while..  I want to thank you for taking the time and stopping by to check out my SOUS project for this weeks reveal.. I hope you stop by S.O.U.S and check out what amazing projects our design team has created to inspire you to play along..
I hope everyone has a wonderfully scrappy weekend..
hugs

November 23, 2012

Christmas Cookies- Sketch challenge SOUS

Hello fellow crafters..
I'm so psyched its Friday for many reasons and being its sketch reveal is one of them.. This weeks sketch was designed by our very own Leah and I loved her sketch.. I wanted to put my Imagine to good use, plus use one of the Christmas themed cartridges that I've hoardered..LOL

So, without further a-do, here is my take on this weeks sketch:


The prints and die cuts are all printed and cut with my Cricut Imagine printer and die cutter..

How about a few close ups:
Mrs.Claus is so cute..
 I added some white liquid pearl drops to accent her bun, sleeves and neck ruffles. Inked the edges  of her with brushed corduroy distress ink..

The Title "Christmas" is cut from the Christmas essentials cartridge and "Cookie" is cut from the "From My Kitchen" cartridge.  I inked the edges of the cookie to make it looked baked..LOL  and added some liquid pearl drops to add some detail..
I attached it to the layout with foam tape to give some pop.. 

and then my gingerbread men, plus my plate of chocolate chip cookies.. The plate of cookies was edited from Mr.Claus's die cut by separating the cuts.  I added lots of doodles with a white marker..

For supplies used:

Cricut Craftroom for design
Cricut Imagine

Cricut Imagine Cartridge:

Santa's Village:
Mrs.Claus, gingerbread men and cookie plates
all background prints

regular cartridges:

George and Basic shapes:
circle and triangles

From My Kitchen:
"Cookie" title

Christmas Essentials:
"Christmas" title

Brown, cream and white cardstock
Distress ink: Brushed Corduroy
White marker
White liquid pearls by Ranger
foam tape
ATG fun

well my fellow crafters.. I want to thank you all so much for stopping today and checking out my project for our sketch reveal for S.O.U.S
I hope everyone gets a minute or two and check out what our amazing design team has created, just click HERE and you will redirected to S.O.U.S
hope everyone has a scrap-tastic weekend..
hugs

November 16, 2012

Owl Family- Die Cut challenge S.O.U.S

Hi fellow crafters...
Its another Friday reveal for us girls over at S.O.U.S and this week we have a die cut challenge for you.. Our Leah has chosen this weeks die cut and its OWL on any project..
I again played around with CCR and came up with this cute layout using one of my all time favorite cartridges: Create-A-Critter..  I love the cute little critters on that cart..  This is actually the first time I got to use the owl on one of my layouts, but I love how it they came out..

So, here is my take on the challenge:

I have a photo of my kids, hubby and myself I plan on adding to this layout as soon as my happy ass goes to the store to buy ink for my printer... LOL

How's about a few close ups:
The branch is from the BLOOM cartridge and the scallop square is from the ACCENT ESSENTIALS.

For the trees, I got the bark from POOH AND FRIENDS and then used GEORGE AND BASIC SHAPES to create the greenery.. the big tree is actually a heart turned upside down :)  Plus, my cute little owls.. 

The title OWL is cut from OPPOSITES ATTRACT and the word FAMILY is cut from HOME ACCENTS..  My Imagine wasn't cooperating with me and cut off a lot, but then my daughter said that the white showing on the word FAMILY  looked good, so I kept it instead of re-cutting it.. 

For supplies used:

Cricut Craftroom free design software
Cricut Imagine-printer and die cutter

Imagine Cartridge for color palette:
Kate's Kitchen

Regular Cricut Cartridges:

Pooh and Friends
Tree bark

Create-a-Critter:
Owls

Bloom:
Branch

George and Basic Shapes:
Heart, Oval and Circle.

Opposites Attract:
Title: OWL

Home Accents:
Title: FAMILY

Accent Essentials:
Scallop Square

cardstock: Bazzil Basics
Papers by: Day Dream stack by: Heidi Grace
chalks
distress inks
foam tape
white gel pen
white marker
MS edge punch
Corner rounder punch

well fellow scrappers.. That's it for me for today.. I want to thank you for stopping by today and checking out what I created for our die cut reveal at S.O.U.S.. Do stop by and check out what amazing projects the rest of our DT have created to inspire you to play along with us..
I hope everyone has a scrap-tastic weekend..
hugs