May 31, 2014

Wedding card-Primitive


Happy Saturday
and
Welcome to this month's blog hop
with
The Creating Blog Hops Café


You should of arrived here from LORI'S blog, if you just stopped by and want to join the hop, just click HERE to start from the beginning..

This month's theme is... Wedding or Anniversary. We have made some wonderful projects to share with you and to give some inspiration for those upcoming summer weddings.

Our Hostess for this hop is...

Our wonderful Sponsor for this month's hop is...


So, sit back and grab yourself a Latte' as we dare to amaze you with our projects.

I decided to create a card that is so ME.. I love the traditional wedding/anniversary cards, with the elegance etc,  but I'm not all fancy and so decided to go a bit Primitive and I do have a silly sense of humore, so went that direction instead. I love the primitive style and I have my home decorated some what primitive :)

Here is the card I created:


I wanted to create an old crackled window frame that has been re-vamped into a chalk board.. Lots of details so lets get to some close ups:

Love this cute crow.. I know its not exactly a white dove, but those of us that love primitive, know that the crow is the way to go..LOL


I grabbed my brown wire and decided to create a primitive style hanger for the board, to look as if It's having on a the wall.. 


I added drops of glossy accents to the "berry's" on the twigs.. Love the way they turned out..

Here's a good close up of the crackle I created.. been holding onto my crackle medium and this was a great time to put it to good use.. 

My sun flower cluster with lots of primitive goodies..

and there ya have my take on today's wedding/anniversary blog hop theme :)
so, now your next stop will be:

If  you get lost along the way here is the entire line-up for todays hop for you to get back on track and not miss a single project.
5. Miranda with... http://www.nanasscrapspot.com/
Thank you for hoping along with us today and I hope that we have inspired you to get your craft on. 

Till next time..
Hope you have a scrap-a-licous weekend
Hugs
Nanné

May 30, 2014

Cuddle Monkey-Die cut reveal-SOUS

Happy Friday ladies.. 
Here to share a layout with you for our Die cut challenge reveal over at SOUS.. For todays challenge, we were asked to use a CIRCLE on our projects.. 
I decided to create a fun background and then adding some fun die cuts to embellish my layout, plus I wanted to use of my youngest son's photos from when he was a little toddler...

This is what I created:

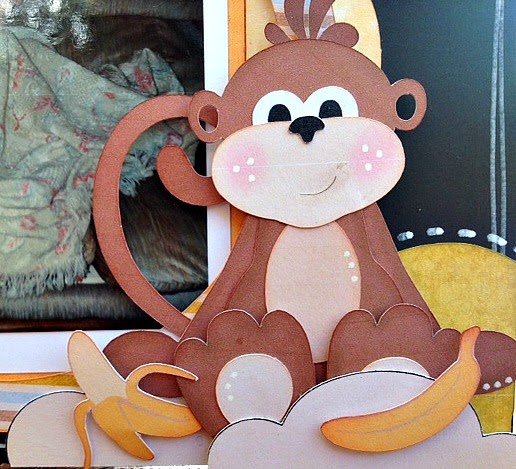
Those monkeys are in the SIL store and I just loved them when I seen them..LOL 

how about some close ups:


super cute little monkey.. 

created my own title phrase using some free fonts and die cuts..

and this cute little guy with his bananas..LOL

and for suppplies used:

Silhouette Cameo
Silhouette designer edition software

die cuts: linked
SIL store

white and black cardstock
digital papers:  Sweet Shop Designs

chalks and inks for shading
white marker for doodling
foam tape

and there ya have it.. A fun layout for a fun challenge..
So, do stop by SOUS and check out what amazing projects the rest of our design team has created for today's reveal..
Till next time fellow scrappers
Have a scrap-a-licious weekend
Hugs
Nanné

May 23, 2014

Joy of Summer-SOUS sketch reveal

We're soooo close to summer, I can smell it..LOL   We've had some amazingly warm weather here in Finland.. Love living here cause of the different seasons, each so beautiful in its own way...
So, with summer just around the corner, I decided to create a summer themed layout for todays sketch reveal over at SOUS..

This is what I created:
Its a little different than my normal style, but I really enjoyed creating this.. I suppose sometimes its great to try something new, as scary as it may seem at first..LOL

how about some close ups:


Did some heat embossing and used some of my favorite MS punches..

My daughter when she was 4 yrs old. This was back in 1993, she had a swing in our front yard..

and there ya have it fellow scrappers..
My project for our sketch reveal..
Do stop by SOUS and check what AMAZING layouts the rest of our design team members have created using this week sketch.. 
Till next time, hope you have a scrap-tastic week
Hugs
Nanné

May 20, 2014

Congrats, You made it!!- PPPR reveal

It's that day today fellow scrappers, my reveal day for Pretty Paper, Pretty Ribbon..
I have a cute graduation layout I want to share with you..

My kids are all in their early 20's, but I've never had the chance to scrap any of their graduation photos..
Bad mommy, I know..LOL
So, when I seen these ADORABLE graduation cutting files, I knew it was time to grab a photo and get it on paper..

This is what I created:
Since we live in Finland, graduation works a little differently here than in the States.. 
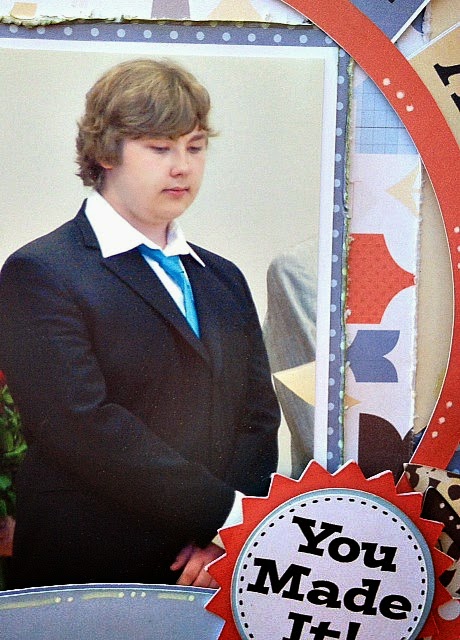
All of the boys wear suits instead of a cap and gown, then their teachers hand every student a red rose after the principle hands them their diplomas..  My sons teacher is standing behind him in the photo :)

I decided to use some of my Echo Park hybrid papers along with plain cardstock.. First I took 12x12 piece of brown cardstock, tore the edges and adhered it to the tan cardstock background.. I then cut some notebook paper trim which is in the Note Book Paper Cutting file and tucked that underneath the top of the cardstock and just added a strip of white cardstock to the bottom, to create the illusion that its one long piece of paper :)  Last but not least, doodled on the edge with a white marker..

How about some close ups and details:

I absolutely love this cute little guy, he's in the Graduates Cutting File.  I added the light blue trim to represent the color of my sons tie, gave him rosy cheeks with some pink chalk and that smile just says it all :)

I also added the scroll from the Hats Off Cutting File by tucking it behind the paper layers..
For the title, I used the banner pieces from the Simple Banners Shapes cutting file,  just flipped them upside down and tucked them underneath the circle trim.

Loved the badge, which is also in the Graduates Cutting File.   I had to incorporate it into this layout some how and I think it worked out perfectly with the saying on the banner :)   The stars used are in the Best Buddies cutting file..  Next to the badge is a banner that I will add journaling to and that its in the Sentiment Spots 3 Cutting File..

and of course I had to include a close up of my youngest son Adam..


Thank you so much stopping by today 

Hugs
Nanné


Here are the files I used:

Notebook Pages Cutting FilesGraduates Cutting FilesHats Off Cutting Files


Best Buddies Cutting FilesSimple Banner Shapes Cutting FilesSentiment Spots 3 Cutting Files


May 16, 2014

3D die cut reveal-SOUS

Happy Friday fellow crafters..
Us girls over at SOUS are having our Friday die cut revel today and for this challenge we were asked to create a 3D project or to add a 3D die cut to out projects..
I decided to create a box of treasures..
This is what I created:
Everything you see is hand made or a die cut of sorts..
The box base is a cut file by Lori Whitlock that I found in the SIL store..
I then tweaked it a bit by adding the faux wood sides and faux metal trim..

I'm not convinced with the colors of the die cuts, just could not get them to play nice together, but it is what it is..LOL

How about some close ups:


and there ya have my box of treasures.. not sure what I will keep in it just yet, maybe some photos and journaling tags..

Do stop by SOUS and check what amazing projects the rest of our design team has created for this challenge..

Till next time..
Hope you have a scrap-tastic weekend..
hugs
Nanné

May 10, 2014

Girly Blog Hop- Pretty Paper, Pretty Ribbons


Welcome to Pretty Paper, Pretty Ribbons Girly blog hop..

If you came here from Melissa's blog, you are in the right place.  If you just stumbled upon this post and would like to start from the beginning, please visit Lisa's blog." 

For today's hop, we were asked to create a GIRLY project.. 
I decided on a layout and used some of the fun GIRLY cutting files from the PPPR store..

This is what I created:
Is this blurry or is just me?.. It looked great when I took it :)

I used one of the labels in the layered labels from Layered Labels 1 cutting file to create the over sized background and then added some scalloped trim to the bottom of the layout using the Borders 2 cutting file..

well, I got GREAT close ups of this layout:

This froggy is the cutest, he can be found in the Rainy Day Critters file.. I love Lisa's cutting files because they can all be cut in layers.. I used the face and hands from the rainy froggy :)
for the banner of flowers, I created that using the banner strip from the Simple Banner Shapes cutting file, the flowers and leaves are from the Flower Assortment Cutting file..
I also used some free fonts to create the title phrase..


Here is one of the dresses from the Dress Up Girl Pink Dress cutting file
I decided to add a little ribbon trim to the bottom and stickles to edges of the layers..


The hangers I used are from the Mommy To Be cutting file. I did have to do a little cutting  using the cutting tool in the designer Edition of SIL software to separate the hanger from the baby clothes :)


close up of my little baby girl.. 
She is about 2 yrs old in this photo and she just turned 25 yrs old a few days ago.. 
Where does the time go?..


and then the cute little girl and her pet rabbit..LOL
The cute little girl can be found in the Dress Up Girls Cutting file
and the cute little bunny is in the Forest Critters cutting file.


for my cute little butterflies, I wanted them to actually look as if they were hover over the layout and so, grabbed some brown craft wire, twirled a piece of it around a paint brush handle and then used some foam tape to attach it to the back of the butterflies :)  I tucked the other end under the flowers to hide it..
Those cute butterflies can be found in the Spring Garden cutting file, the mushroom is in the Forest Critters cutting file and the flowers and leaves are in the Flower Assortment cutting file..

Whew... LOL  That was a lot .. 
It took me a few days to put this layout together but it was so worth the hard work, I really enjoyed spending that time just concentrating on my project instead of whats for dinner or if the laundry needs to be put away..LOL  I'm sure you can relate..

So, we have some blog candy for this hop and it is as follows:

The blog candy for this hop is a $15 GC to the PPPR store.

 "For a chance to win, you must be a follower of each blog and leave a comment on each blog. For extra chances, you can also "LIKE" Pretty Paper, Pretty Ribbons on Facebook and/or sign up for the Pretty Paper, Pretty Ribbons Newsletter   A random winner will be chosen for the prize on Tuesday, May 13.  
and don't forget about the  PPPR Girly Challenge.  The projects can be anything girly-themed. The rules are below.  Just Click here to submit your projects and their will be one random participant that will win $20 to PPPR.

1.  The theme of this challenge is Girly...so create anything girl-themed. Pretty Paper, Pretty Ribbons products must be the FOCUS of the project.
2.  Please link to your actual blog post...not to your blog.  If you don't have a blog, you can add a photo of your project to the Girly Challenge photo folder in the Pretty Paper, Pretty Ribbons Project Parade Facebook Group .
3.  You can enter as many different projects as you want for more chances to win.
4.  The challenge will run for 3 weeks.  You must link up your project by 11:55 pm CST on Saturday, May 31, 2014.
5.  One random winner of a $20 Gift Certificate to PPPR will be chosen.  Our Design Team will also choose our PPPR Top 3.  Winners will be announced on Wednesday, June 4, 2014.

Here's the lineup just in case you get lost on the way:


Thank you for hopping along with us girls 
and do join the challenge for your chance at winning the $20 gift certificate to Pretty Paper, Pretty Ribbons online store..

Till next time fellow crafters..
Hope you have a scrap-tastic weekend
hugs
Nanné 

May 6, 2014

Rock On Layout-PPPR reveal

Hi fellow crafters..
 I have a "rockin" layout I wanna share with you today that I created for my project reveal over at Pretty Paper, Pretty Ribbon..
My son learned how to play the guitar in middle school and they got to perform at the end of the school year in front of the whole school :)  I decided it was time to scrap one those photos and this is what I was able to create using the "Rock On" Cutting file and the "Fourth of July kids" cutting file..

The background mask I created using my cameo by cutting out some rectangles from the 12x12 white cardstock.  Once I had the mask cut, I adhered it to a 12x12 piece of red cardstock, creating the illusion of red brick.. Then added strips of dark blue cardstock to the edges of my layout and doodled the lines with a white marker..

how about some close ups:

I decided to chalk the edges of the fingers bringing them to life :)
The hand and the guitar picks are in the "Rock On" cutting file.. I also used the flourish from the "Friends Forever" cutting file..

This cute little guy can be found in the "Fourth of July Kids" cutting file and I added guitar and the musical notes from the "Rock On" cutting file.  I really wanted to use a Peachy Keen stamp for the face and thought this was perfect with the tongue hanging out..LOL

I love love love this big title, it can be found in the "Rock On" cutting file

and had to include a close up of my lil Rock Star who's not so little anymore..
and there ya have it, my layout for todays post..

Thanks for stopping by and taking a look at my project..
hugs
Nanné


here are the files I used:
Rock On Cutting Files Fourth of July Kids Cutting Files
Friends Forever Cutting Files


May 5, 2014

Project Life challenge- Ledger

Wowzah.. Is it Monday already?  How fast time flies, when you're having fun..LOL

Us girls over at SOUS are having our Project Life challenge reveal today and we were asked to use LEDGER or GRID on our spread...

I've been having loads of fun playing around with my own Project Life designs along with some of the ready made I've found in the SIL store.. Super fast way to get your hands on some really beautiful cards is by buying them from the SIL store :)  Love my Silhouette Cameo by the way ( cant' say that enough)..
So, I decided to use some photos that I had from week 16.. My youngest son Adam got his hair cut ( a miracle by any means) and we started enjoying warmer weather, spring finally arrived..
although, it was snowing this morning when I woke up.. :)
Here is my PL spread for todays challenge reveal..
These are really hard to photograph, so bare with me :)

got some close ups for ya:


and their ya have my PL spread for our reveal..
Do stop by SOUS and check out the other amazing takes on our challenge..
Till next time
hugs
Nanné