August 9, 2012

Theme Day Thursday reveal: BEDTIME


Happy Thursday fellow scrappers.. 
I love Thursday's since its layout reveal for My Cricut Craftroom blog and its one day closer to Friday..LOL
This Thursdays theme is:
BEDTIME

I had a blast creating this layout of my daughter when she was a baby.. I've been wanting to scrap some of her baby photos but just hadn't had the right theme..LOL Perfect for this weeks challenge..
I used Cricut Craftroom Design software to design this layout , plus all of the printed papers were printed using my Cricut Imagine and Hey Diddle Diddle cartridge..

Here is my layout:

OUT FOR PUBLICATION


the base prints I used a 12x12 square from the George and Basic Shapes cartridge, filled it in with one of the pink prints from Hey Diddle Diddle Imagine cartridge.. I then used my Martha Steward around page punch.
Then I did the same with the Grey pattern then cutting that at 9". punched some 1" x 12" white paper strips with my MS edge punch and then tucked them underneath the grey mat.
the large circle, I first cut white at 8 3/4" and then Pink at 8 1/2".  Added my photo mat 4 x 6 also printing and cutting the images from Hey Diddle Diddle cartridge..

I love this hippo from the Hey Diddle Diddle Imagine cartridge.. I cut in layers, pop dotting them to create dimension. added a few drops of Pink liquid pearl. 
Here you can see some of the dimension and isn't she just the cutest..LOL

I cut the crib twice at 4 1/4" from Every Day Paper Dolls cartridge in white.  I then used my George and Basic Shapes cartridge to cut a few rectangles in different colors.. first pink, then grey and finally flower print, which I then edge punched with my MS edge punch. inking all of the edges with pink ink. finally attaching the bottom crib frame first to my layout, then the rectangles to represent the bedding, followed by the top crib piece,which I off set a little bit.. I then cut a blanket at 6 1/4" (white) and then 6" for the flower print, both from the everyday paper dolls cartridge.. inking the edges again with pink in, cutting into it to be able to tuck part underneath the crib and finally, adding a few drops of pink liquid pearl.
The cute little teddy bear and bottle are both on the Hey Diddle Diddle Imagine cartridge.. I edited the images so that the background was deleted..I cut the teddy in layers at 3" and the bottle at 2".

The humpty Dumpty can also be found on the Hey Diddle Diddle Imagine cartridge, he was cut at 4" which I also cut him in layers to delete the background print.. The book is from My Community cartridge, which I cut at 3"..
The two lambs can be found on the Wild Card2 cartridge..Its not just for card making, I love using the images for layouts.. I cut the lamb at 3 1/2". I cut it twice, first in light grey and then white..since I only wanted to use the white for the face. the fluffy body I cut in light pink and the head is dark grey.. all the colors can be found on the Hey Diddle Diddle Imagine cartridge..
I also found my title on the Hey Diddle Diddle cartridge.. I edited the colors of the text to match my layout and then printed and cut it at 3", but before attaching it to my layout, I used my Cricut Craftroom basics and cut the white scalloped circle at 3 1/2".. finally foam dotting them together, to once again add little dimension to my layout.. plus, a few pink liquid pearl dots..

and finally the photo of my little girl.. 
She was born 5 weeks preemie and only weighted 4 lbs 12oz, so she was a tiny little thing.. 

and for the list of supplies used:

Cricut Craftroom design software (free)
Cricut Imagine printer and die cutter

Imagine Cartridge:

Hey Diddle Diddle:
Patterns and colors
Hippo
Humpty Dumpty
Teddy bear
bottle
title

Cricut Craftroom Basics:
scalloped circle

Regular Cricut cartridges:

George and Basic Shapes:
squares, rectangles and circles

Wild Card2:
Lambs

Every Day Paper Dolls:
crib
blanket

My Community:
open book

White cardstock

foam dots
liquid pearls: white and pink
white marker
MS edge punches
Inks by: colorbox


well my fellow scrappers.. I think I got everything listed..whew, its a lot of work remembering everything especially when you get into that zone of crafting and forget to write it all down..LOL
I want to thank you all so much for stopping by today and checking out my Theme Day Thursday project, do stop by My Cricut Craftroom Blog and see what the rest of our design team has created..
hope everyone has a scrap-tastic week
Hugs

August 6, 2012

For You card-YMH DT project

Yikes.. Monday already?..LOL  
well, that can only mean one thing, its another reveal for me and today, I've made a card using some Prima North Country papers.. I love the smaller stacks, they are great for making cards.. I'm not much of a card maker, but every year come Xmas, I have no cards made to send out to family and friends.. And every year I promise myself to start on them a little earlier..So, How about making them in August, the hottest month of the year..LOL
so, with that said, here is the card I created:
I used lots of Prima bling on the this card and I also used my MS edge punch to create the cute edges.. 
I ended up using my Cricut for this card, love the snowflakes and then the branch.. Inked the some of the edges with distress ink using the Winter distress ink kit..

How about a few close ups:

here you can see how I inked the edges of the scalloped square and the leaves..

I made the bow out of paper and in this close up, you can see what it looks like.

I used foam dots to lift the images off of the card.. Love adding dimension to my cards, plus you can see how the punched trim was inked with the festive berries distress ink..
This has to be one of my favorite color combinations for winter.. 

Now, for the list of supplies used:


white cardstock
blues were printed with my Imagine
Cricut Imagine die cutter
MS edge punch

well my fellow scrappers.. Thats my Monday post for this week.. I want to thank you for stopping by today and checking out what I've created as my design team project for Your Memories Here.. Do stop by and grab yourself some awesome deals while they are available.. 
Ok..I'm off to create some more Xmas cards.. LOL
Hope everyone has a scrap-tastic week..
Hugs

August 4, 2012

100 cart blog hop for Aug-MCCR


Well hello fellow scrappers..

 Welcome to the 100 cart blog hop and I'm so glad you stopped by today to check out what I've created.  You should of arrived from 

 If you just stopped by and want to join us for the hop, please start your hop HERE, it will redirect you to the My Cricut Craftroom Blog.

Collectively the design team uses over 100 different Cricut Cartridges in their projects during the two days of this hop.  Sunday the new members of the design team will be announced and some have even made a project to share with you. What an exciting weekend..
As a special treat, enjoy 10% off of your total purchase with Erica's Craft Room Store. Use the code AUGUST to see 10% off of your total purchase (No exclusions)

This is my very first blog hop for MCCR and I was beyond excited to get some cute  projects made.. 
As most of you already know, I am crazy for my Cricut.. I absolutely love to create fun cards and layouts, plus I can make them personalized just for me :) and I love to share my ideas with fellow scrappers all over the world.. 
so with that said, lets get to my first project:

For this project I used one of my ALL time favorite Imagine cartridges: Kate's Kitchen and a cartridge I recently purchased: Love You A Latte


This card measures 5"x7"
I used my Cricut Imagine to create this card.. I was able to combine an Imagine cartridge along with a regular Cricut Cartridge, to be able to print the colors & prints from the Imagine cartridge.. This way all the colors and prints coordinate perfectly :)
 I printed the dark green (4 3/4"x 6 3/4") and then brown (4 1/2"x 6 1/2") color from the Kate's Kitchen cart
onto white cardstock and then cut it with my Imagine..
for the sign in the background, I first printed the shadow in cream and the regular in a red pattern, they were both cut at 4 1/2".


I love the big jar that is on the Love You A Latte cartridge.. 
 first printed the background of it in cream, the front in the cherry pattern and the lid in the light green.. I inked the edges with an olive green ink by Colorbox, then adding a few drops of white liquid pearls to the edge..

The sentiment "Thinking of you!" is from the Sentimentals cartridge.. 
The sentiment is cut at 1 1/2" out of brown cardstock.  The coffee beans are from the "Love You A Latte" cartridge and those are also cut at 1 1/2"..
The coffee bean bag came out so cute..LOL 
 I cut it at 2 1/4", first with brown then with the light green colors.. For the coffee cup, first the base of it I printed in dark brown, then cream and red.. finally the small details in light green and it's also cut at 2 1/4"

and then for my second project,  yes you read right.. 
I created a layout using Sesame Street & Friends cartridge and I combined it with the colors from Kate's Kitchen Imagine cartridge.. having both cartridges plugged into my Cricut Imagine at the same time.. Love that feature by the way :)

here is my layout:
I used my Cricut Craftroom software to create the background print.  
Using George and Basic shapes, I placed two rectangles and an oval onto the virtual mat and stretched them to fit.. afterwards, I filled the top one with the dark green, the bottom one with a mid blue and the oval with a dark red.. Choosing the "print only" option, using my Cricut Imagine, I was able to print the background without cutting it..Love that feature by the way..LOL
The yellow journaling banners on the left side of the layout are hand cut and I added some computer generated journaling.


For my characters, I chose to use Bert and Ernie (my fav's).. Bert is cut at 5" and Ernie is 3 1/2".. once I pieced them together, I covered both characters with glossy accents and let dry..   The bathtub is cut at 3 1/2" in yellow, the toothbrush is 1 1/4" and the towel is from Everyday Paper Dolls, cut at 8" in red.. Because most of these did not have a blackout cut available, I edited the images using Cricut Craftroom software to hide some of the cuts.. I then cut the blackouts from white cardstock.

The soap is cut at 1 1/2", the shampoo and bubble bath is cut at 2".. I also did some image editing to get the black out cuts for these die cuts using Cricut Craftroom software..

and finally, my little boys.. Aaron on the right and his younger brother Adam on the left.. They are both in their late teens now, so it was so much fun grabbing an old photo to scrap..LOL

For the photo frame, that is located on the Accent Essentials cartridge and I cut it 5".. first in white and then the actual frame in red.. inked the edges with red ink by Colorbox.  The bubbles are on the Everyday paper dolls cartridge and cant' remember what size I cut those, I apologize.. but they are printed in blue ink and then foam dotted onto the frame..  The title is from Create-a-Critter cartridge and cut that at 2 1/2" first the shadow in white, then the normal cut in blue.. 
and last but not least, the brush is located on the Sesame Street and Friends cartridge.. I cut that at 1 1/2" in yellow..

whew.. that was a lot to remember..LOL
ok  fellow scrappers.. 
Your next hop stop will be :


and if you get lost along the way, here is the entire hop line up:

MCCR http://mycricutcraftroom.blogspot.com/
Nanne http://nannes-creations.blogspot.com/ <--(me)
tess www.sassycricutcrafting.com
Jamie M http://craftygirl21.blogspot.com/
Janet http://janetscreativeworld.blogspot.com/
Mary http://Mary-fortheloveofart.blogspot.com/
Lisa Ch http://lisacustomscrapbooking.blogspot.com/
Ashley http://especiallymade.blogspot.com/
Jamie http://babyjaydensmommy.blogspot.com/
Melissa http://papershenaniganz.blogspot.com/
Erica's Projects http://ericasprojects.blogspot.com/
Marji www.fstampaholic.blogspot.com
Nadja http://nadjarobbins.blogspot.com/
Andrea http://creativedesignsbyandrea.blogspot.com/
Robin http://create-a-latte.blogspot.com/
Christina http://cema1cema.blogspot.com/
Jodie http://jodiesscraplab.blogspot.com/
Mona http://scrapbookingforjoy.blogspot.com/
Ava http://scrapbookdesign4u.blogspot.com/
Jessica W http://www.craftinandstampin.blogspot.com/
Blog Candy http://ericasblogcandy.blogspot.com/


Happy Hopping everyone :)
hugs

August 3, 2012

Rockabilly Princess-sketch reveal for SOUS

Oh, how happy I am that it's FINALLY Friday.. 
It's been a long 8 day work week for this gal and trying to find some scrappy time has been virtually impossible..But I did manage to start and finish this layout I created as my Sketch reveal project for S.O.U.S..
 Our very own Leah designed our sketch for this week 
and here is my take on it:


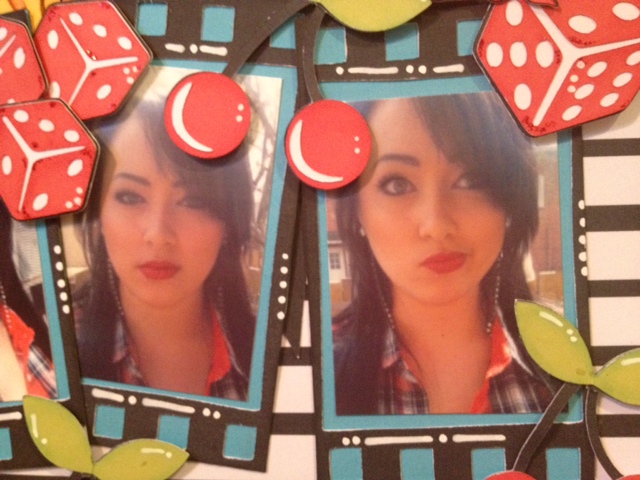
I found these photos of my daughter on my computer and it hit me like a ton of bricks to create a Rockabilly layout for her.. 
I had a lot of fun creating this layout and Leah's sketch was a big inspiration for me :)
and this is what our sketch is for this week:

How about a few close ups:
Instead of the circle, I decided to create a star.. I also added the title on top of, using foam dots..
and I actually put my Gypsy to good use.  I wanted a Rockin font and knew the blackletter was going to be perfect.. since I don't own the cartridge, I was lucky enough to get it as a free download for my Gypsy.. love this font by the way..

Love the way the flames came out.. cut some in yellow and in orange, then glued only the bottoms down to the layout, making them look like they are flapping in the wind..LOL
final finishing touches, I added some orange and yellow stickles to my flames..
love these photos of my daughter Amber..

and these...

she is wearing red lipstick in the photos, so of course I had incorporate red lipstick to the layout.

and what rockabilly layout would be complete without adding some 50's shades..LOL and I added some white marker accents all over the layout.. it seems to be the me thing a now a days..

and for supplies used :

Cricut Craftroom for the design
Cricut Imagine for all die cuts
Cricut cartridge:
Kate's Kitchen for colors
White cardstock

Regular Cricut cartridges:

Forever Young:
Lipstick and Sunglasses

Mickey and Friends:
Film Strip

Country Life:
Cherries

Indie Art:
Flames, dice and Star

Black letter:
Font "Rockabilly" and banner

Once Upon A Princess:
Phrase "Princess"

White Marker pen by: Posca
Distress Ink: Brick red
chalks
foam dots
glue pen
Stickles: yellow, orange and red

well my fellow scrappers.. That's it for me for today.. I'm so glad you stopped by today and checked out my project for our sketch reveal over at S.O.U.S.. Do stop by and check out what amazing layouts our other design team members have created and hope you get a chance to play along..
Hope everyone has a scrap-tastic week..
hugs

August 2, 2012

Theme Day Thursday for MCCR


Helloo fellow scrappers..
I am posting a layout today that I created as my Theme Day Thursday challenge over at My Cricut Craft Room and for this week, out Theme is " Box of Doomed Papers!" ..
Hmmmmmm?  you are wondering..LOL
well, we were asked to use some of our scrapbook papers that we dislike.. and I found some that I definitely never liked and why I bought them you ask?, well, I have no idea.. a clearance sale is the devil..LOL
So, anyway... I decided to use some of these DCWV Retro stack papers and decided to use as many Cricut cuts as possible to cover them up... 
 I went for my Walk In My Garden cartridge, which has to be one of the very first cartridges I bought..

Here is my layout:

It was really difficult at first to get into the spirit of this layout, but once the die cuts started getting into place, it started looking pretty good..LOL  For the scalloped circles, I actually turned one of the hideous papers over and used the white instead of the print..LOL

how about some close ups and details:
The title I cut from the Kate's ABC's cartridge- font2 and they are all cut at 1", I used a white shadow and then different colored letters..

all of the flowers were cut from the Bloom cartridge.  the flowers were cut at 1. 3/4", the big center was 3" and the small center was 2 1/4".. I cut then all different colors, inking the edges and then adding some detail with a white marker..
the lady but was cut at 2", first the white shadow, then the blue bug and finally yellow top.. 
the leaves that run across the bottom of the layout are cut from the border-leah3 and at 1 3/4".
the watering can was cut at 2 1/2", first in white, then blue, then twice for the layers, once in red and again in yellow.. The garden tools were cut at 3".

The sign was cut at 5" in blue.. the title font is cut from Kate's ABC's and at 1", using different colors and with a white shadow.. adding drops of white liquid pearls for details.

and finally, had to sneak a photo of my little Amber.. She was just about 3 yrs old in this photo..as most of you know, she turned 23 in May.. where has the time gone?.. 

so, for the supplies used to create this layout:

Cricut Craft room free software
Cricut Imagine
Kate's kitchen Imagine cartridge

cartridges:
Walk in my Garden
leaves, bug, watering can, garden tools and sign
Kate's ABC's
Font for title (font2)
Craft Room Basics
scalloped circle and regular circle

Papers by: DCWV Retro stack
carstock: white and green

white liquid pearls
white gel pen
pop dots
MS edge punch
corner rounder punch

well ladies.. that's it for me for today.. Do stop by My Cricut Craft Room and check out what the rest of our design team has created..

hope everyone has a fantastically scrappy week..
hugs