December 30, 2011

Let it Snow- SOUS die cut reveal

Yikes, Tomorrow is New Years Eve already?.. Wow, how fast time flies when your having fun..
I had a lot of fun putting together this layout for our die cut challenge over at Stuck On U Sketches aka SOUS.. We were challenged to use "SNOWFLAKES" on our project (any project), but once again I chose to make a scrapbook layout and used a photo of my daughter that she had a friend take one day while they were outside in the cold.. I absolutely love this photo of her in her furry coat..LOL

here is my layout:

this layout is out for publication

I once again used a lot of different techniques on my layout, one being heat embossing.. Which I have several close ups of:

I used clear embossing ink , swirly stamp and some
 Winter Wonderland embossing powder.. it glimmers!!
I also thought it kind of resembled the wind blowing..


Here is a close up of the journaling I added.. plus all the pink Rhinestones I added..


My big snow flakes.. Which I cut from the Winter Woodland cart.. Love these!! cut them in white cardstock, then inked the edges with Blue Denim Distressing ink, pop dotted them for an 3d effect and then added a small punched snowflake to the middle of the smaller ones, plus pink Rhinestones..


The title I cut from the Winter Frolic cart, added a few MS punched snowflakes and then rhinestones.. you can also see my branches here, cut those from the Winter Woodland cart..

and finally my daughter Amber.. 
plus, my big MS edge punch work with some small snowflakes and rhinestones..

as for the supplies used to create this layout.

Papers by: Dovecraft "Christmas Fancy" collection
cardstock: White

Cricut Expression and Design Studio software
Cartridges used:
Winter Woodland:  Snowman, snowflakes, twigs
Winter Frolic: Title 
George and Basic Shapes: Big circle

Martha Steward edge punch
Martha Stewart snowflake punch
mini snowflake punch

Pink Rhinestones
pop dots
Distress ink: Blue Denim, Rusty Hinge and Peeled Paint

Swirly Stamps by Inkadincadoo
Ranger embossing ink pad
Winter Wonderland embossing powder
heat gun
computer generated journaling
glue pen

well ladies.. that was a long list but I had a so much fun putting this layout together.. 
I want to thank you all so much for stopping by today to check out what I've been working on and I hope you all get a free minute out of your busy schedules and stop by SOUS and check out what the rest of our very talented Design Team have been creating.. 

I want to wish you all a very Happy New Year..
Hugs

December 28, 2011

Happy New Year-W W reveal

Yikes! Can you ladies believe that we're almost done with yet another year..
 I can't believe how fast time is just flying by, but then again if it didn't fly by, I would have nothing to scrap about..LOL
so, with that said, (LOL) us ladies over at Whimsical Wednesdays are having out Wednesday reveal today and out theme is "Happy New Year!" and we were to create a card/project using a sentiment from one of Stephanie's cute stamp sets, I chose to use one from the "Everyday Sentiments!" collection, or we could post a favorite card/project from the previous year.. I decided to make a new card, since it's become my newest obsession..LOL

Here is the card I created for out challenge:

I have really gotten a kick out of creating cards.. 
which as most of you know is pretty new to me..LOL
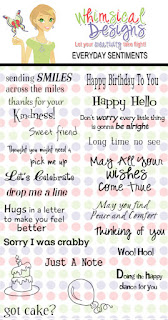
as for the stamp collection, this is what it comes with and its so versatile!


you can check out Stephanie's stamps, by clicking HERE

I have one close up:

I found these champagne glasses on the Sweethearts cart, 
which is a cart that I haven't used in a really long time.. :)


For supplies used:

Stamp collection by: Whimsical Designs

Papers by : Prima
White and brown cardstock
white gel pen
pop dots
Martha Stewart edge punch

Cricut Expression
Carts used:
Sweethearts: Champagne glasses
A Childs Year: Scalloped oval and "2012"

Liquid pearl: white and gold
Tim Holtz distress ink:  Rusty Hinge

well ladies, that does it for me for this Wednesday.. Come stop by Whimsical Wednesday and check out what the other amazing Design team members have created for this challenge..

I want to wish you all Very Happy New Year.
Hugs

December 23, 2011

Family- SOUS reveal Dec 23rd

Panic has finally set in, only one more day till its Xmas Eve and here in Finland, we actually do our Christmas thing on the Eve.. We get together and have a big dinner, then the Santa actually comes over with a big bag of gifts, sits around and sings xmas songs with the kids and finally passes out all of the gifts.. About a hour later, he hugs the kids and tells them to be good all year till next Xmas..  Ok!, my kids are in their late teens and there's no way, I can pull off  Santa coming over...LOL  so, were going to be doing all of the above, except for the Santa bit... 

but, even in my last minutes of hecticity, I did get a chance to get a layout done, at the "St.Nick" of time...(I'm so funny, ain't I?)  I absolutely loved the sketch that our very own Sandi Clarkson created for this week, and I wanted to do a Xmas layout, since I had not done one yet this year..

Here is my take on our sketch:
 and the sketch:


for a few close ups:
This photo was taken the Xmas before last.. I love this photo, by the way, that is mom aka Gramma on the right, she stands at 5.6" and all my kids have passed her up ..LOL

the title, which was a sticker that came with these awesome Bo Bunny Noel Papers..
the poinsettias are by Petaloo..

and for supplies used:

papers by:
Bo Bunny: Noel Collection
Poinsettias: Petaloo
White liquid Pearl
Leaves: Petaloo
Paper edge distresser..

well ladies.. The supply list is short this week..LOL
I want to thank you all so much for stopping by to see what I've created.. 
I want to wish you all a Very Merry Christmas and hope you get to spend it with your loved ones..
Hugs

December 21, 2011

Home for the Holidays- WW project

Happy Hump day ladies... 
That means only two more working days till the weekend.. Wooo Hoooo..LOL
and since its Wednesday, I get to share a project with you that I created as my design team project for Whimsical Wednesdays reveal..
We were to create a Christmas/Winter or New Years Home Decor Project.. It took me a few days to think about what I wanted to create, for inspiration I grabbed Stephanie's stamps and had a peek through and when I seen the "Elves at Work!" quote, I knew that a little work shop was about to be built..LOL

Here is my project:
I hand cut with my paper trimmer some chipboard sheets into several pieces and then used brown cardstock to piece the house together.. I also cut strips of white cardstock, used my MS edge punch and made the lace trim..
here is a side view:

 I will be adding a family photo to the back of it.. so, I remember what year I made this and how old my kids were.. times just slipping through my fingers now a days..

The little elf and gifts were cut from the Jolly Holidays cartridge, font is cut using the Winter Woodland cartridge and the Christmas tree from the Winter Frolic cartridge.. Snow flakes are a MS punch and both banners are hand cut.. added some wintery ribbon trim and lots of bling and silver stickles..LOL
plus, the stamp.. Oh that adorable quote that I used from the Snow Much Fun collection.. 

well ladies.. that's my project for today.. 
Do stop by Whimsical Wednesdays and check out the other projects our amazing DT have been busy creating..  and join in on the fun, I have sponsored this week challenge with some Websters goodies.. 
thank you all so much for stopping by today..  
Hope everyone has a wonderfully creative week..
Hugs

December 19, 2011

Seasons Greetings card- DT for YMH

Happy Monday once again ladies and its only 6 more shopping days till Christmas..LOL  I'm done shopping for my kids for this year which is great, usually I'm one of the late comers..LOL

For my design team project for today, I made another Christmas card using the Prima Printer collection that I received in my grab bag, plus I also used the little Prima roses and the bling that also came in the baggy of Prima goodies.. Plus I had some prima lace left over from previous projects, the string of pearl I once attached with Helmars Gemstone Glue , title attached with zapdots  for dimension and the title I cut with my Cricut Imagine.. Tried to mimic the little blue rose, by dabbing cold paint on the edges of the letters after I inked them ranger distress inks. Hmmmm.. !! LOL

and a few close ups:


You can create one of these cards by selecting a few products that can be found at Your Memories Here..

supplies used:


from my owns stash:  brown cardstock, gold trim, string of pearl, leaves, ribbon, gold paint dabber and title

I want to thank you lovely ladies for taking the time out of your busy schedules and stopping to take a look at my DT project for this week..
Hope everyone has a Very Merry Christmas
Hugs

December 16, 2011

Holiday Baking Recipe Mini- DT SOUS

Whew!! talk about working on this till the last minute...LOL  I got it all done, except for all of the recipes that I plan on putting in the inside.. 
I made this recipe mini as my design team project for Stuck On U Sketches and our die cut challenge for this week.. Which is "What are you BAKING for the holidays?"  and my answer to that question is: everything that's going on the inside of the recipe book, these are all of our Christmas favorites..
and I actually plan on keeping this for myself and one day, I will hand it down to the one that's the most worthy..LOL
This will hold all of the secret recipes that I have which have been passed down to me by my grandmother, my mother and my mother-in-law...

So without further a do, here is my recipe mini:
It measures 4.5" x 7.5" and the base of it is heavy chipboard..
I made this entire mini using my Cricut Imagine and the Kate's Kitchen Cartridge..

and for some pics of the inside:

basic supplies for baked goods.. 

The Swedish chef from the Muppets always said " Its speacy, spicey!"..LOL
Memories of my childhood..loved the Muppets, still do...

Everyone needs to know the tools they will need...

 I cut the salt and pepper shakers in two to tuck them underneath the sides of the  photo..

there is a pull out tag that tucked in the bowl.. it has "grandmothers recipe for a loving family!" on the tag..

I added a little baking history and how its defined..LOL

this is my little half page, where I added a tag pocket out of the bowl of eggs.. I figured I would write down some helpful hints as I come across them..

this is where the actual recipes will go... 


and finally the inside of the back of the cover..
I think I will have lots of fun with this mini...LOL

and for supplies used:

Cricut Imagine
Imagine cartridge:  Kates' Kitchen
George and basic shapes
Sentimental 
From My Kitchen

heavy chipboard
white cardstock
green, red, yellow and blue cardstock
ribbon and fibers
button
knife and fork charm
pearl halves
brad
binder rings: green
Tim Holtz distress ink: Vintage photo
Martha Steward Edge punch
computer generated journaling
black and white gel pen for faux stitching

Well ladies.. that does it for me for today..
I want to thank you all so much taking the time out of your busy holiday schedule and stopping by to check out what I've been up to.. I'm really going to have fun adding my recipes in here and I hope I have inspired you to create a little something of your own for your favorite family recipes..

Hope everyone has a wonderfully scraptastic weekend..
and happy holiday ..
Hugs

December 12, 2011

Holiday Card-Prima DT Your Memories Here

Happy Monday again ladies...
Its NannĂ© again and I want to share this cute and easy holiday card I created using some of the Prima Printery papers and some Prima bling..
Here is my card:
Its a 5 x7 card, I cut out of white cardstock.. Then I layered different colors of white and black Prima Printery papers, that I got in my Prima Grab Bag.. distressed the edges with my edge distresser and finally, I cut six triangle shapes out of white cardstock, punched the edges with my MS edge punch and inked them with Ranger Distress Ink, Finally adding some Prima Say it With Crystals in green on some of the branches.. layered the tree with Helamar Zapdots to give it some dimension.. Gold ribbon is from my own stash.. cute, quick and pretty simple..LOL
Close up of the tree.. 
I will be making lots of these for different projects cause it really was that simple :)

I am loving my Prima Goodies and can't wait to make more of these cards for my family and friends.. 
For supplies used that you can find at Your Memories Here:

from my own stash:  Gold ribbon :)

I want to thank you all so much for stopping by today and taking a look at a quick and simple card I created.. I hope I have inspired you to grab your favorite primas and get crafting..
Hope everyone has a scrap-tastic week..
hugs


December 9, 2011

Friends- SOUS sketch reveal

TGIF ladies..
 I'm going to get some serious X-Mas shopping done this weekend, but before I do I wanted to share a little something something I created as my project for out sketch reveal for SOUS..
Our very own Sandi C created this cute sketch for us girls to work with and I really wanted to make a xmas layout, but my brain wasn't cooperating with me.. So, I went with flowers and friends, plus I wanted to stick with the sketch as much as possible without over doing it....

here is my take on our sketch:

and here is the sketch:
Super cute isn't it with a lot of potential...I loved it!!

for a few close ups:

My flowers from I am roses.. 

My daughter on the right and her BFF on the left.. funny how she is holding onto her stomach, but I assure you she is not pregnant..LOL


found this cute quote on scrapbook.com and had to use.. 

and for supplies used:

papers by:  DCWV 
The Crafty Stack
White and green cardstock

flowers and leaves by: I am Roses
Fiskars flower punch
liquid pearl: white and baby blue
computer generated journaling

Cricut Imagine
George and Basic Shapes: big circle
Plantin Schoolbook: title FRIENDS
White gel pen for faux stitching and doodling


Well ladies... That's it for me for today..
I want to thank you all so much for stopping by today.. Our amazing Design Team has done a fabulous job with this sketch as well and I hope you have free minute to stop by and check them out.  Plus we have a new member on our DT and you have to come and check her out..
.. Just click HERE and you will on your way..
Hope everyone has a scrap-tastic weekend..
hugs

December 7, 2011

Winter Fun-Whimsical Wednesday reveal

Wow..Its already Dec 7th and Christmas is just around corner.. Eeeeek, haven't done much shopping yet for the kids, they are so grown up that I haven't a clue what to get them.. Plus they already have everything.. 
My bad!! LOL

We had our first snow fall Monday night and it got me in the winter spirit.. Us girls over at Whimsical Wednesdays were challenged this week to create a Winter or Christmas themed layout and we were to use something sparkly on it.. I chose Stickles, my favorite of all things and the papers themselves actually have some glitter to them.. Which worked out great for this challenge!!

I decided to use the FREE SNOWMAN HUGS sentiment from the "Snow Much Fun" collection. I thought it was perfect for this layout..


for a few close ups of the layout:


for supplies used:
papers by:  My Minds Eye
cardstock: White and light blue

Cricut Imagine

Snow Angles Imagine cartridge: prints and colors
Winter Frolic : Snowmen and title
Create a Critter: Trees

Martha Stewart punch: Snowflakes
White liquid pearls
Stickles: Frosted Lace (on the snowflakes)
Ranger Distress Ink: Broken China
white gel pen
fine tip green marker
popdots


So, now ladies.. come and join the fun over at Whimsical Wednesdays, by Creating a Christmas/Winter themed project and include something sparkly on it. This can be by adding stickles, glimmer mist, glitter, etc, or you can include a premade glittery embellishment.   You have two weeks to join the challenge..
we have some sponsors for this challenge.. I have sponsored a package of Webster's Goodies, plus Cindy from Cindy's Scraptastic Designs has also sponsored 3 Digi's of your choice..

Just click HERE and you are on your way..
Thank you all so much for stopping by today and checking out my layout for Whimsical Wednesdays..
I hope everyone has a scraptastic week..
hugs